You can’t reliably run a vCenter or NSX environment without infrastructure time synchronization. As with DNS, save yourself time, and get this working before deploying vCenter and NSX Manager. This fourth in a series of NSX Home Lab articles, looks at simple approach to providing NTP services within an NSX home lab.
Objective:
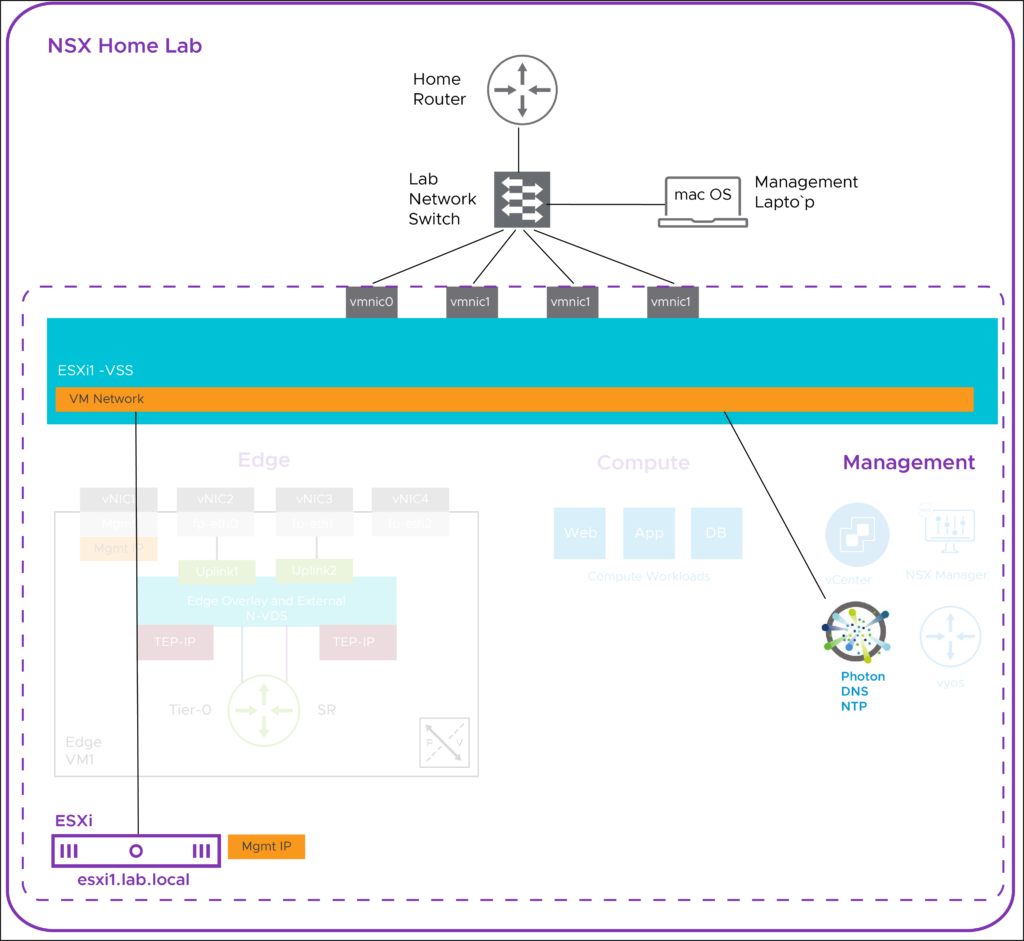
The goal is to deploy a lab based NTP server that will be used to synchronize ESXi, vCenter, NSX Manager, and an NSX Edge to a single common time source.
I’ve chosen to use VMware’s Photon OS as the NTP server operating system. Photon OS is a Linux based, open source, security-hardened, enterprise grade appliance operating system that is purpose built for Cloud and Edge applications. This is already providing DNS services for the lab infrastructure.
I’ve chosen to use ntp as the a free and open-source NTP server.
Here is an article I found helpful in getting me started.
Install Packages:
Install the NTP server.
tdnf install ntpProvision the Photon OS Firewall for NTP:
Provision Photon OS to accept NTP queries on UDP port 123.
iptables -A INPUT -i eth0 -p udp --dport 123 -j ACCEPT
iptables-save >/etc/systemd/scripts/ip4save
iptables -L
Setup NTP Referencing Geographically Close Servers.:
My home lab is in Canada, so I’m using Canadian based time sources.
vi /etc/ntp.conf

tinker panic 0
restrict default kod nomodify notrap nopeer noquery
restrict 127.0.0.1
restrict -6 ::1
driftfile /var/lib/ntp/drift/ntp.drift
server 0.ca.pool.ntp.org
server 1.ca.pool.ntp.org
server 2.ca.pool.ntp.org
server 3.ca.pool.ntp.org
Start NTP:
Start ntp, enable it to start at system reboot, and confirm it is running and listening on UDP port 123.
systemctl enable ntpd
systemctl start ntpd

netstat -tulpn | grep 123
udp        0      0 192.168.1.104:123       0.0.0.0:*                           594/ntpd
udp        0      0 127.0.0.1:123           0.0.0.0:*                           594/ntpd
udp        0      0 0.0.0.0:123             0.0.0.0:*                           594/ntpd
udp6       0      0 fe80::20c:29ff:fe5d:123 :::*                                594/ntpd
udp6       0      0 ::1:123                 :::*                                594/ntpd
udp6       0      0 :::123                  :::*                                594/ntpd
Test NTP:
run ntpq -p to ensure that it is syncing up correctly to upstream NTP servers.
ntpq -p
     remote           refid      st t when poll reach   delay   offset  jitter
==============================================================================
-192.95.27.155   217.180.209.213  2 u   44   64  377   19.453   +0.674   5.029
+216.6.2.70 (up2 195.219.205.18   2 u   39   64  377   28.179  +15.748   7.560
+muug.ca         132.163.97.1     2 u   40   64  377   40.428   +6.976   5.936
*speedtest.switc 206.108.0.131    2 u   34   64  377   47.687   +0.847  11.417
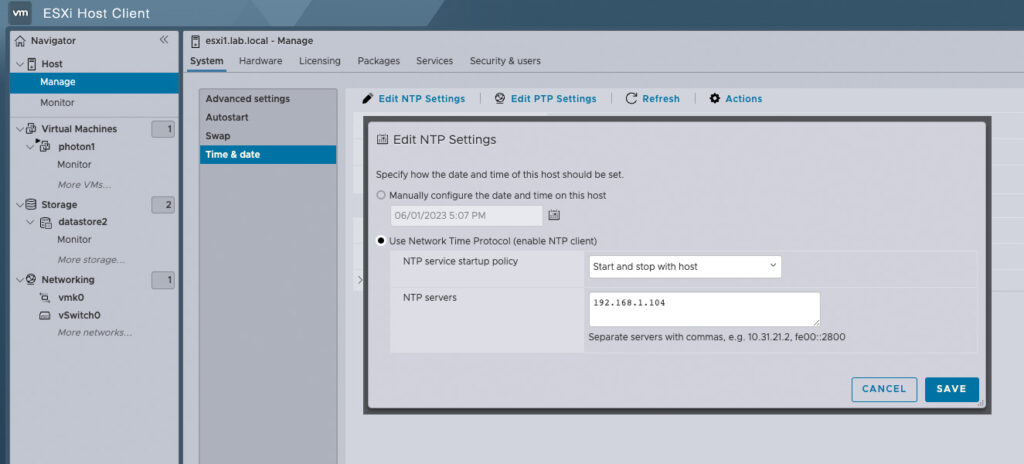
Configure ESXi for NTP:
Point ESXi host to the guest VM, photon1, at IP address 192.168.1.104, the NTP server.
Test ESXi NTP:
From the ESXi CLI verify NTP operation:
[root@esxi1:~] ntpq -p
     remote           refid      st t when poll reach   delay   offset  jitter
==============================================================================
*photon1.lab.loc 144.217.4.129    3 u  565 1024  377    0.300   -2.879   0.855
Conclusion:
At this point in the lab build-out we have a Photon OS guest VM operating as a functional lab based DNS and NTP server.