NSX-T REST API Tips
Introduction:
Here is a collection of REST API tips I’ve learned while supporting NSX-T. The tips are organized in sections for beginner, intermediate, and advanced users. I’m hoping there is something here for everyone!
Beginner Tips, getting set up to access the REST API:
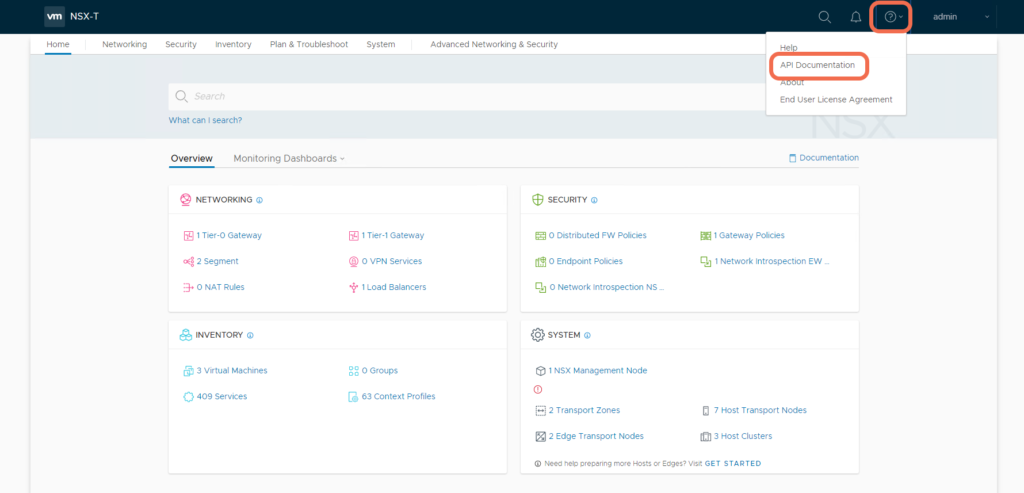
1. NSX-T Manager hosts it’s own REST API Reference
You will probably find launching the NSX-T Data Center API Guide from the NSX-T Manager Web UI more efficient than using the online version at: https://code.vmware.com/apis/892/nsx-t
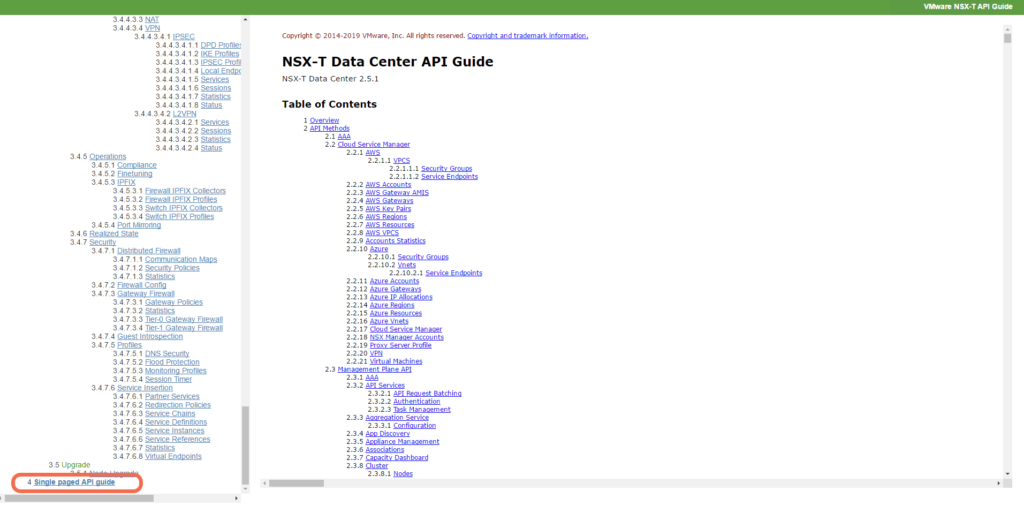
2. The Single paged API guide is great for searching
The Single paged API guide loads the complete document, setting you up to search for a term.
3. Use the Postman App as your REST API Client
First as a Chrome plugin, and now as a more fully featured native app, Postman is how I see most customers interacting with the NSX-T API.
4: Postman can be installed without creating an account
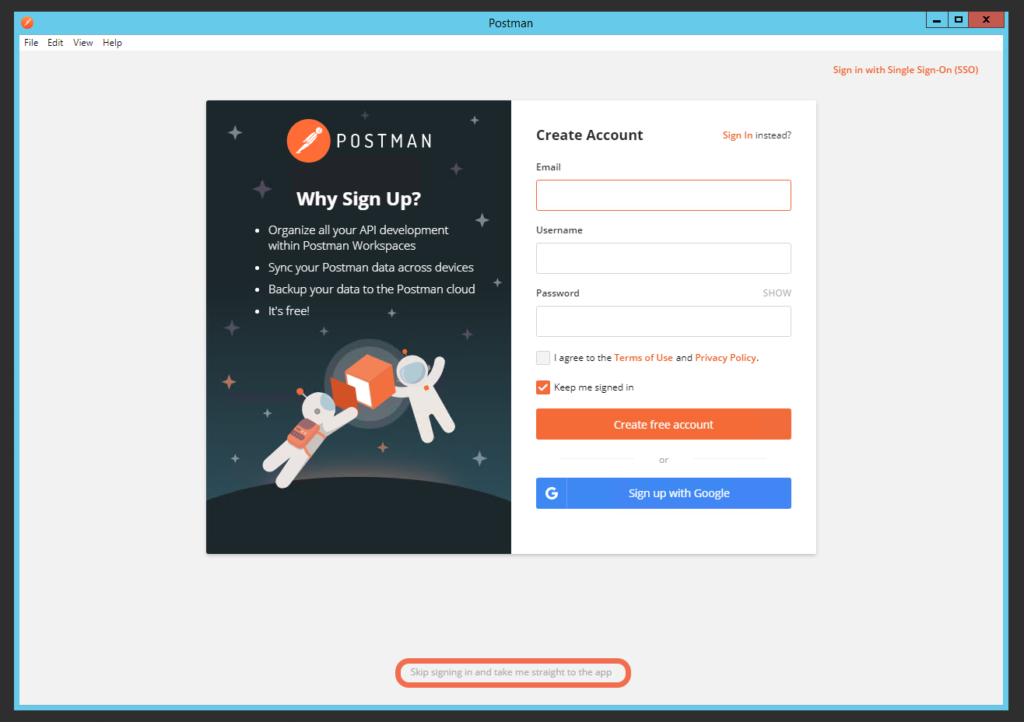
Always read the fine print. ) The default is to create an account during Postman App installation, but notice that there is an option to: “Skip signing in and take me straight to the app”.
5: Disable SSL certificate verification
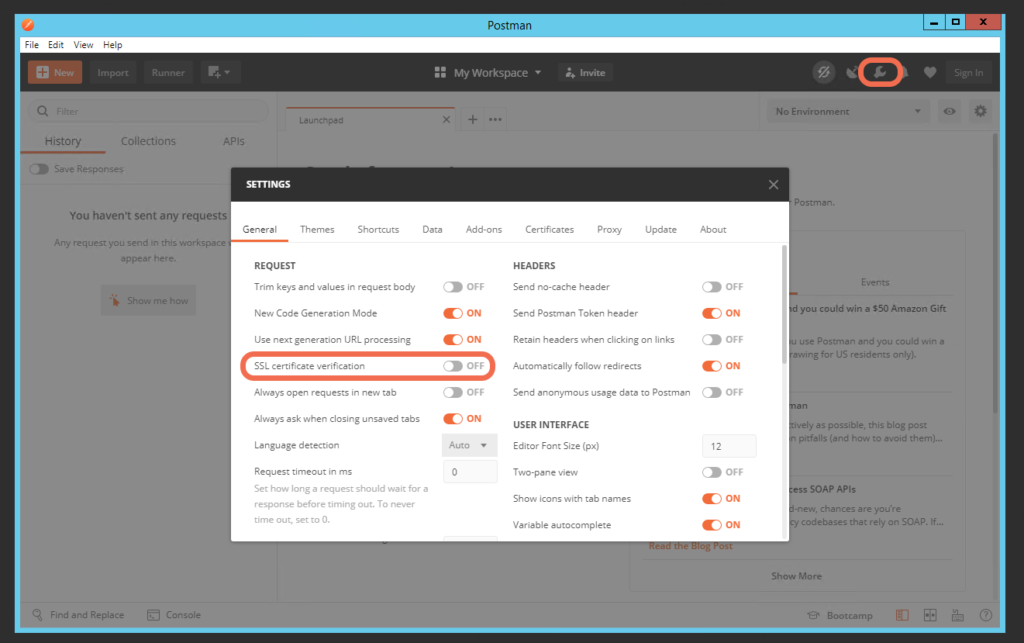
Select Settings, and turn off SSL certificate verification, if you are running NSX-T Manager with self-signed certs.
6: Postman Setup Basics
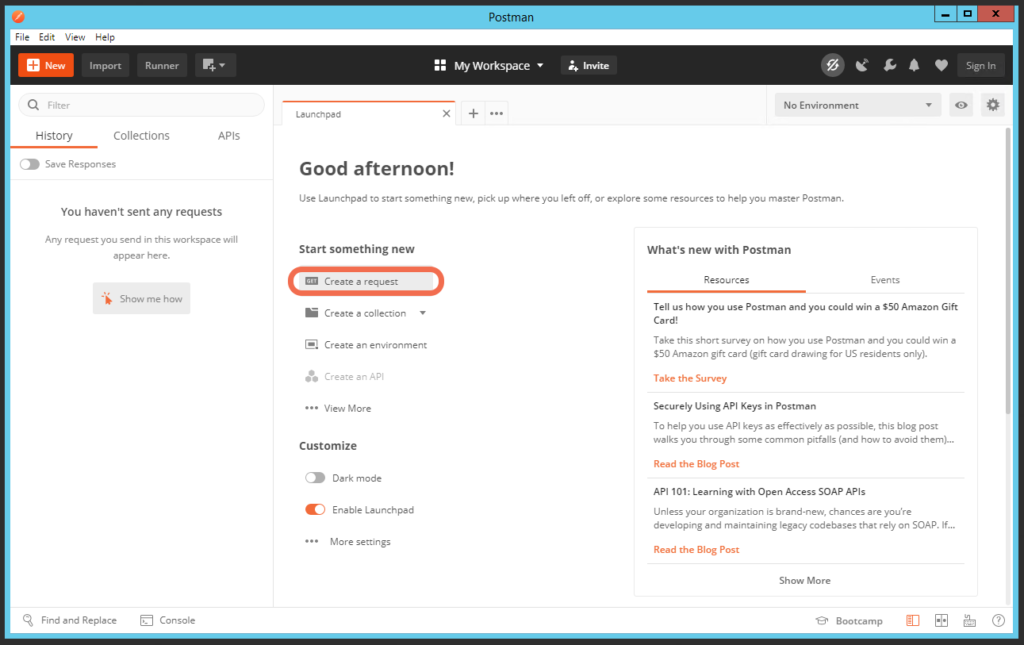
Let’s start by Create a request.
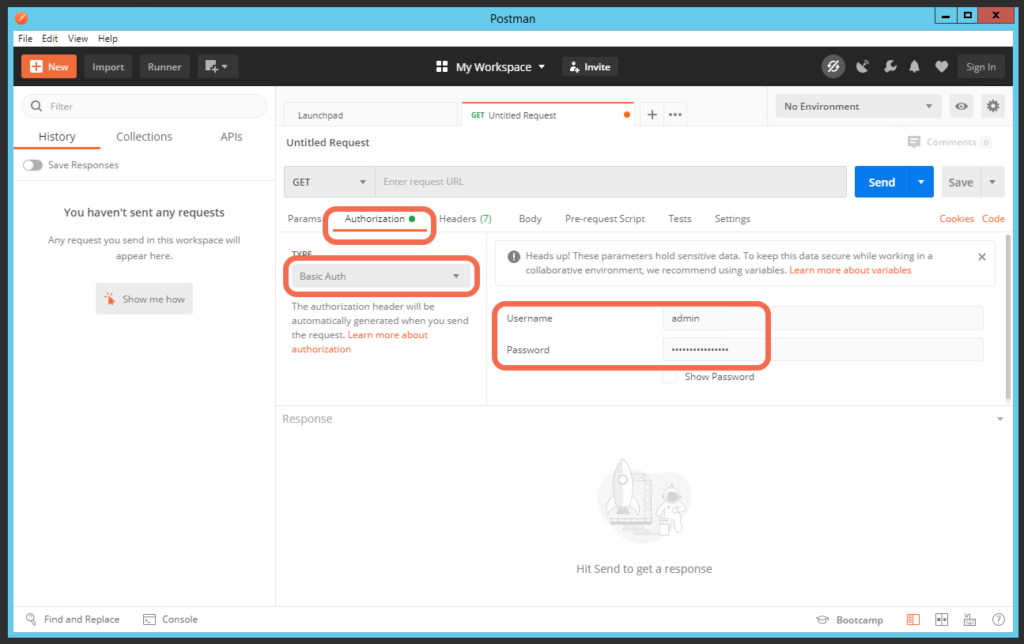
Set Authorization to Basic Auth, and use the admin account and admin password.
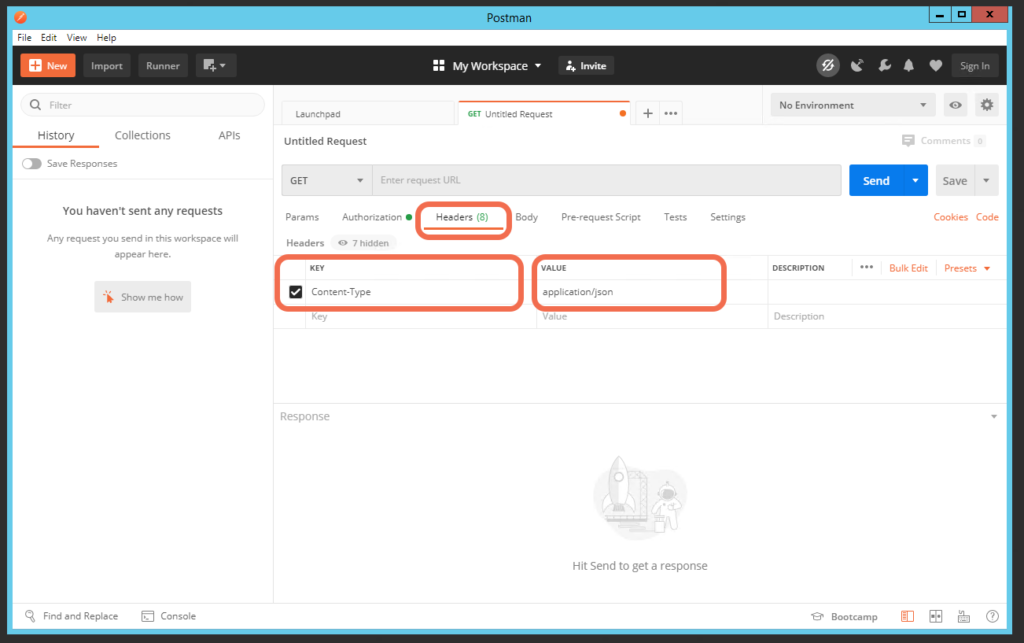
Create a header KEY of Content-Type, with a VALUE of application/json. This will ensure that requests will use JSON object encoding, the format expected by the NSX-T Data Center API.
7: Start with a GET to validate your setup
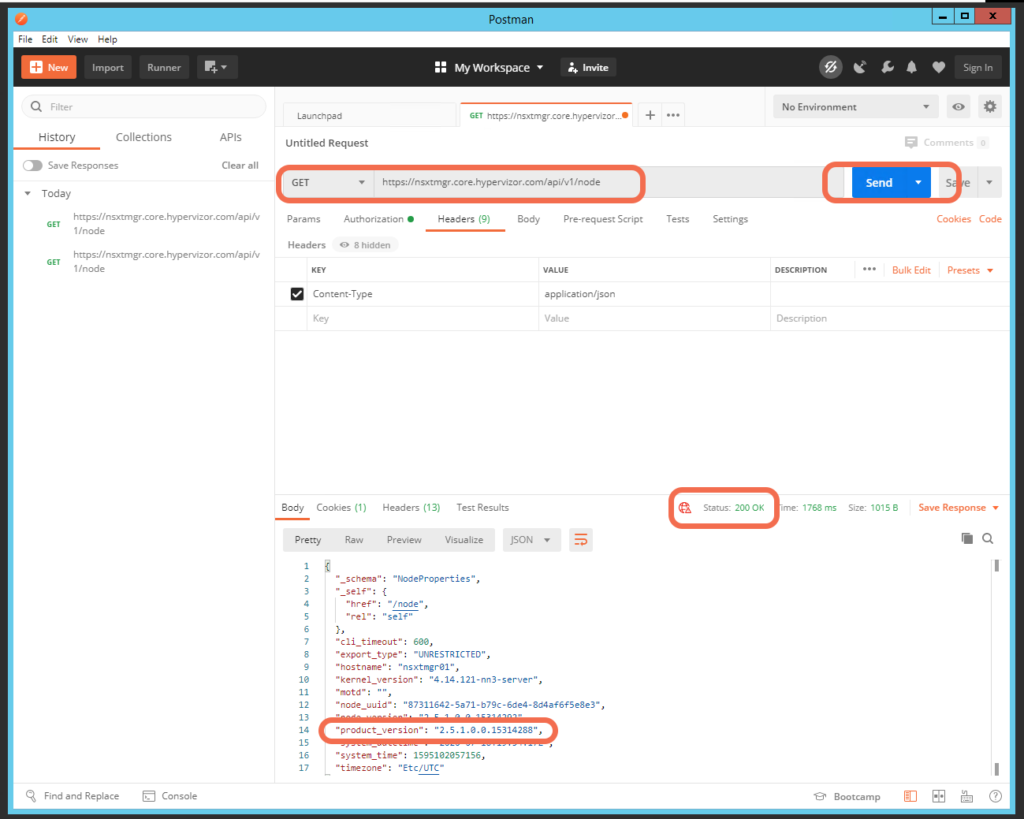
As a functional test we are going to retrieve or GET the NSX-T Manager version:
- using https://<nsx-manager-fqdn>/api/v1/node
- or https://<nsx-manager-ip-address>/api/v1/node
The goal is get a 200 OK Status response, along with a body that includes “product_version”.
We now have Postman correctly configured as an NSX-T REST API Client.
Intermediate Tips, HTTP Response messages and making changes:
8: HTTP Response Messages
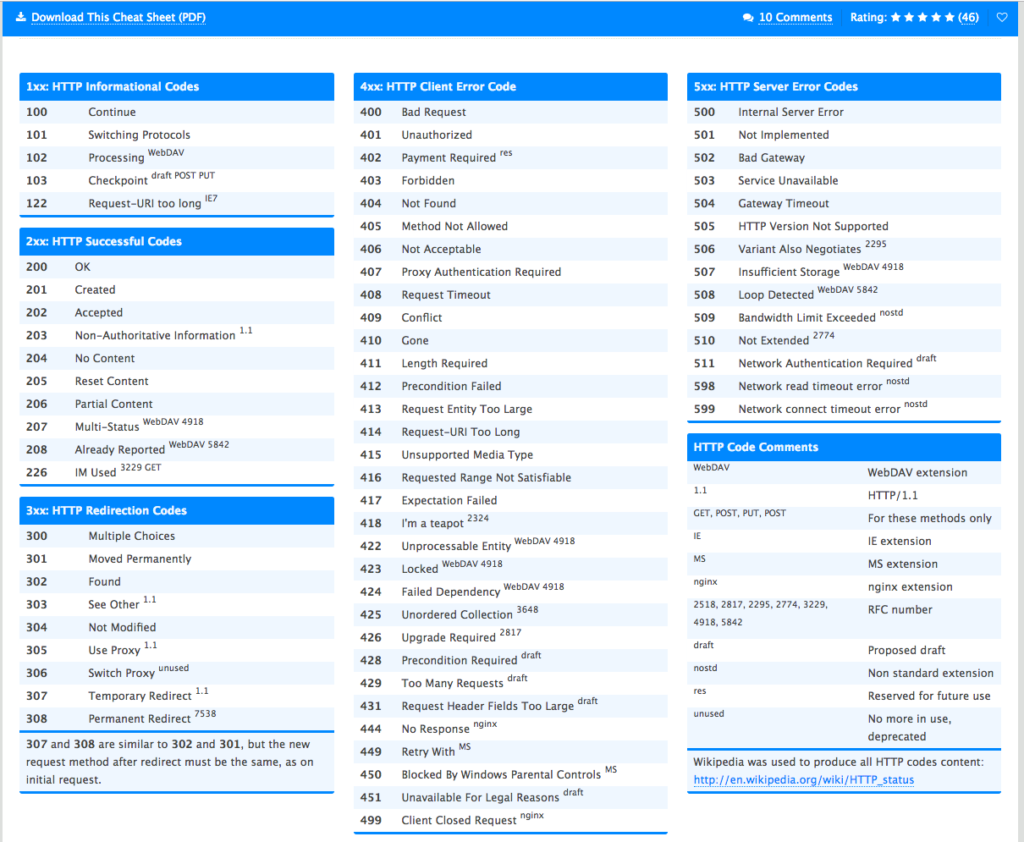
From https://en.wikipedia.org/wiki/List_of_HTTP_status_codes:
All HTTP response status codes are separated into five classes or categories. The first digit of the status code defines the class of response, while the last two digits do not have any classifying or categorization role. There are five classes defined by the standard:
- 1xx informational response – the request was received, continuing process
- 2xx successful – the request was successfully received, understood, and accepted
- 3xx redirection – further action needs to be taken in order to complete the request
- 4xx client error – the request contains bad syntax or cannot be fulfilled
- 5xx server error – the server failed to fulfil an apparently valid request
Here is a great cheat sheet for HTTP Status Codes with a download link: https://cheatography.com/kstep/cheat-sheets/http-status-codes/
9: PUSH or PUT
In some methods, like the creation of a segment, we can use a PATCH or PUT command. The PUT command has an additional requirement, where the “_revision” property must be specified. In order to prevent one client from overwriting another client’s updates, NSX-T employs a technique called optimistic concurrency control. In my lab, I’m not concerned with multiple simultaneous REST API clients making changes, so a more simple PATCH will suffice.
10: Using Body in a PATCH or PUT
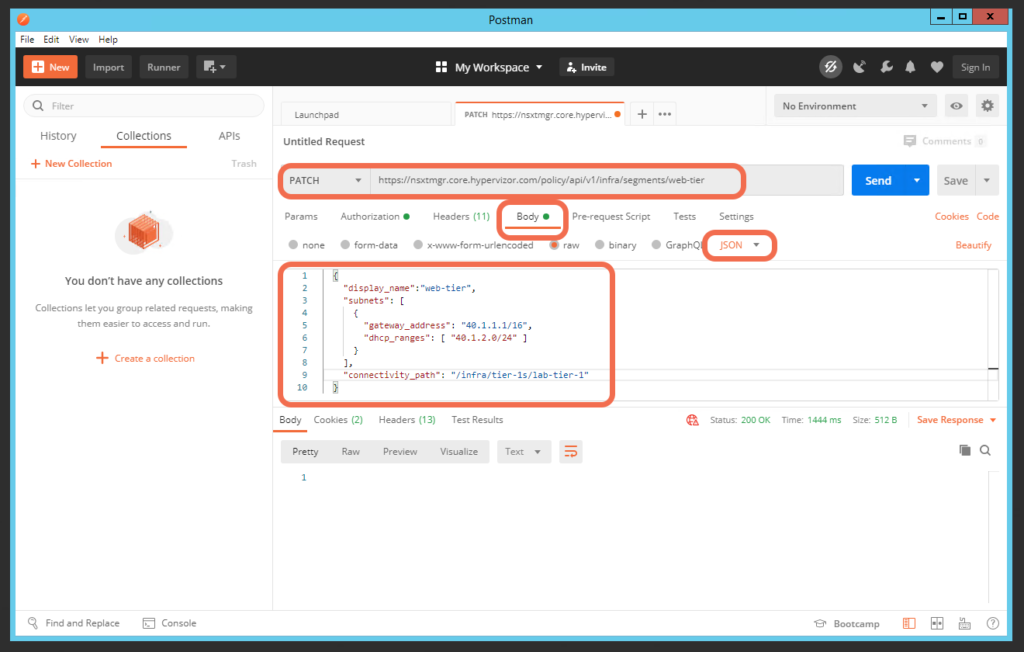
To keep it simple, let’s use PATCH to create a segment named web-tier, using: PATCH /policy/api/v1/infra/segments/
- For my lab, I’ve specified the PATCH as https://nsxtmgr.core.hypervizor.com/policy/api/v1/infra/segments/web-tier
- Select Body, raw, and JSON
- Enter the Segments configuration details into the body of the message
- Select Send to initiate the request
- We are looking for a 200 OK response, to indicate that the Segment was created successfully
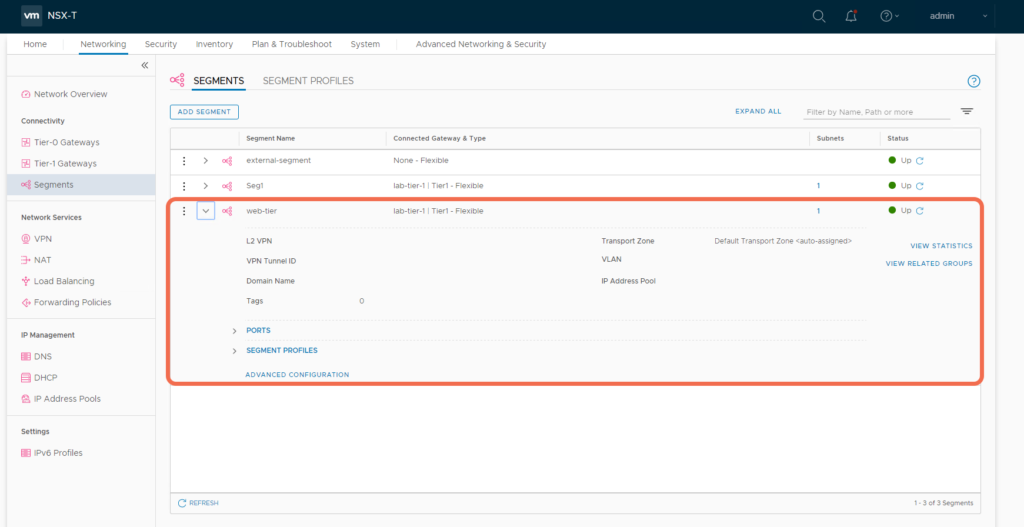
Here is our successfully created Segment:
11: Deleting Protected Objects using X-Allow-Overwrite
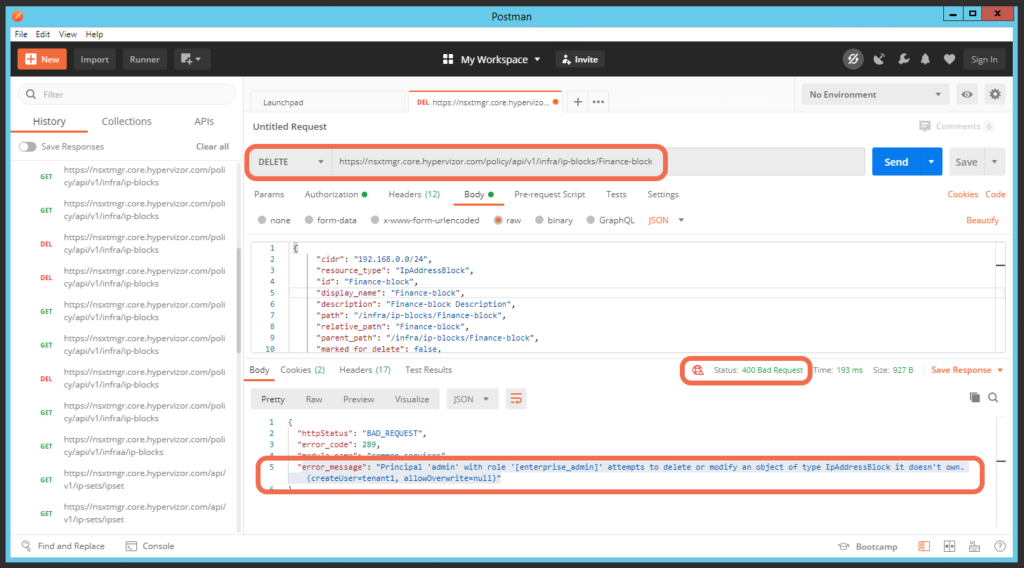
Objects have a property named _create_user. This is typically nsx_policy, the NSX-T built-in Principal Identity. In this case, notice that this IP Block, named Finance-block, was created by a Principal Identity named tenant1:
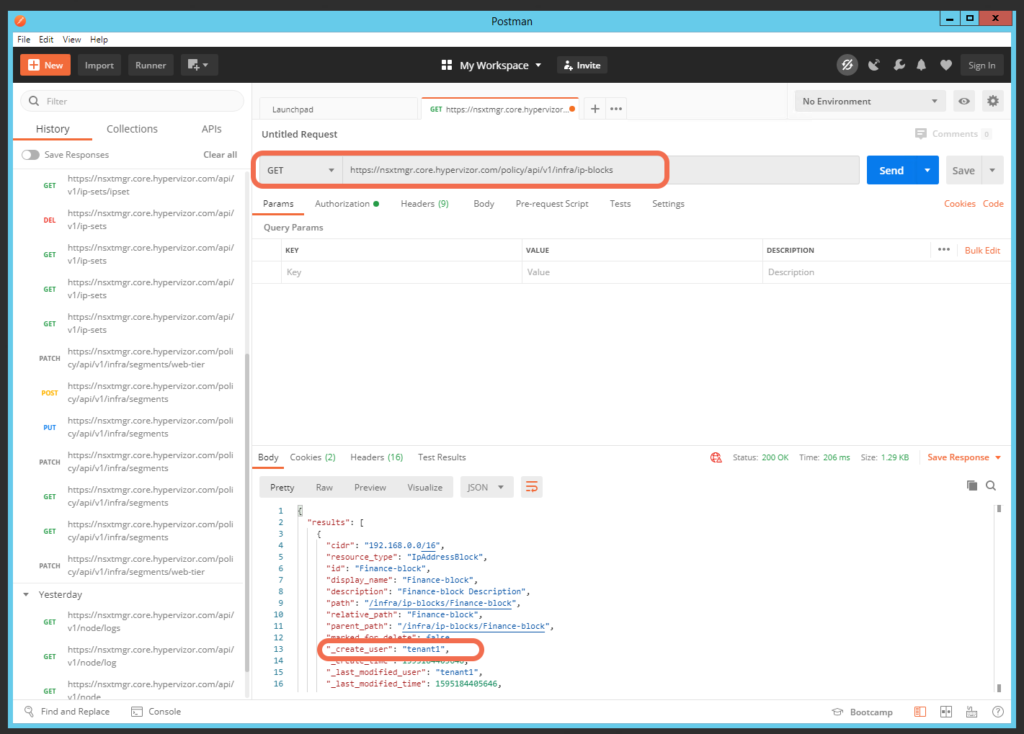
Attempting to delete the tenant1 owned object results in 400 Bad Request since it is protected, with the error message”: “Principal ‘admin’ with role ‘[enterprise_admin]’ attempts to delete or modify an object of type IpAddressBlock it doesn’t own. (createUser=tenant1, allowOverwrite=null)”
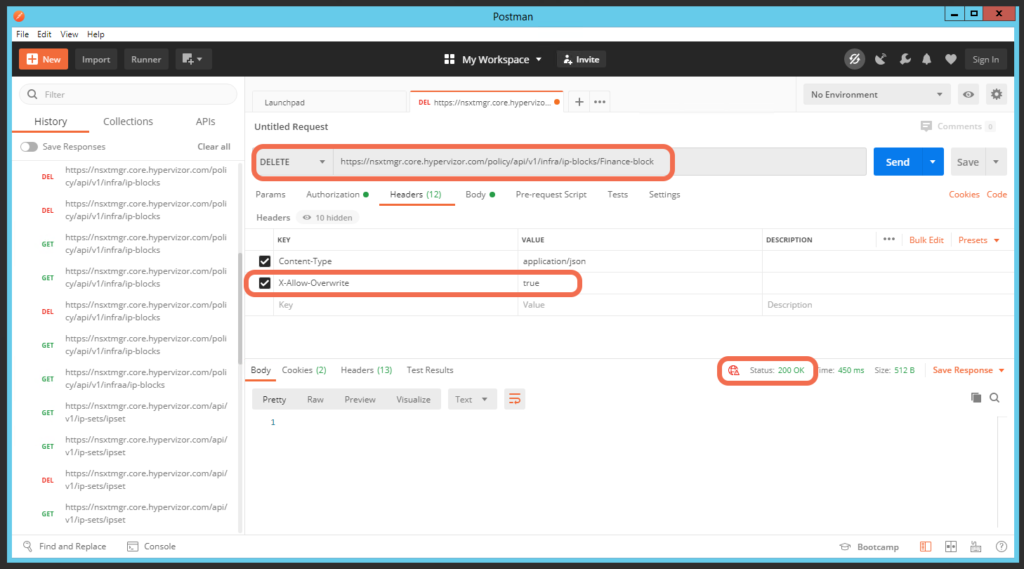
Here is the solution, to delete the protected object, add a new Header KEY: X-Allow-Overwrite, with a VALUE of true. The 200 OK confirms the object has been deleted.
More on Principal Identities here: https://spillthensxt.com/introduction-to-nsx-t-principal-identities/
12: Using Override and Cascade, in Unable to delete Logical Switch
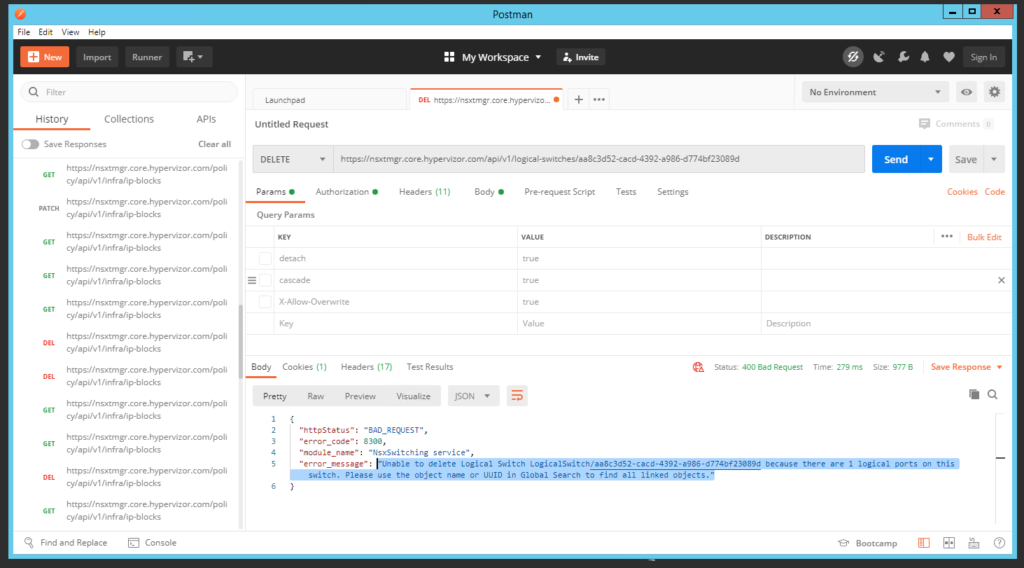
Typically it’s not possible to delete an object if there are dependencies on that object. For example, you can’t delete a logical switch if there are Guest VMs connected to that logical switch. In this example I’ve attempted a delete, resulting in the error: “Unable to delete Logical Switch LogicalSwitch/aa8c3d52-cacd-4392-a986-d774bf23089d because there are 1 logical ports on this switch. Please use the object name or UUID in Global Search to find all linked objects.”
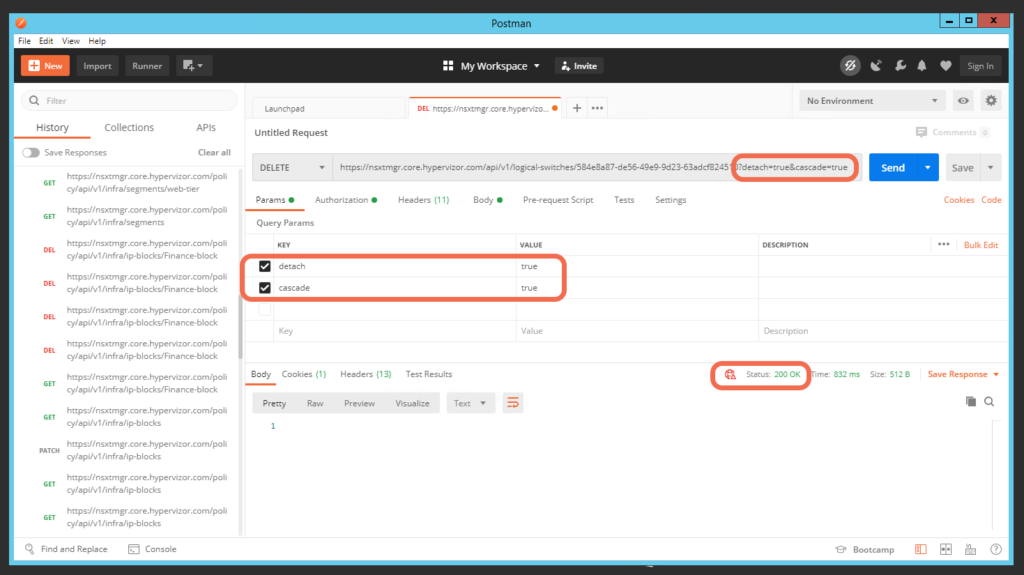
The solution is at add parameters to the delete: ?detach=true&cascade=true to the DELETE:
detach = true makes the delete forcible, cascade = true to delete all the related ports. You can see these in Postman as Params:
Advanced Tips:
13: Using the Management Plane API for determining the realized state of Policy API changes
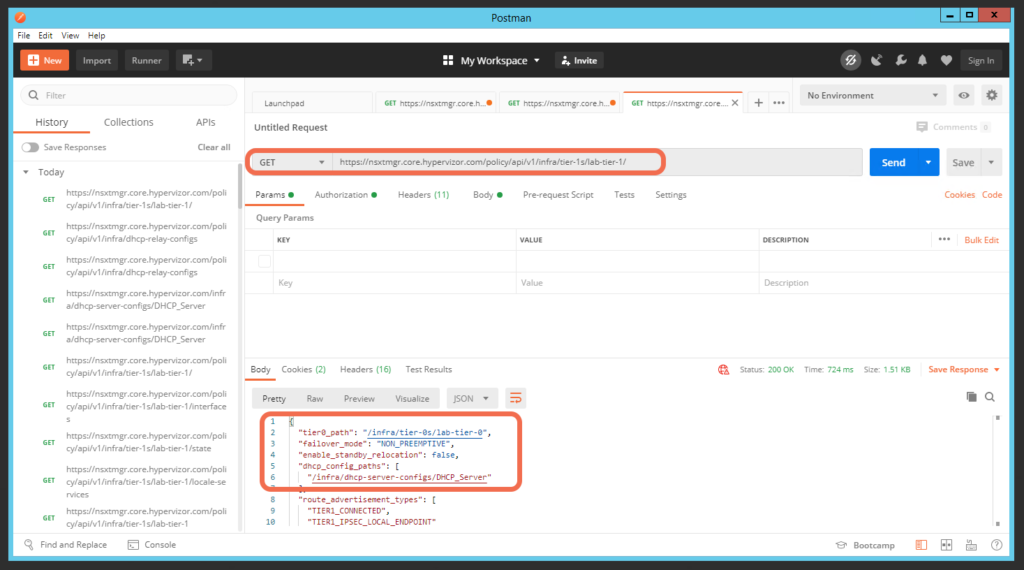
This Policy API GET identifies that DHCP_Server is attached to Tier-1 Gateway lab-tier-1:
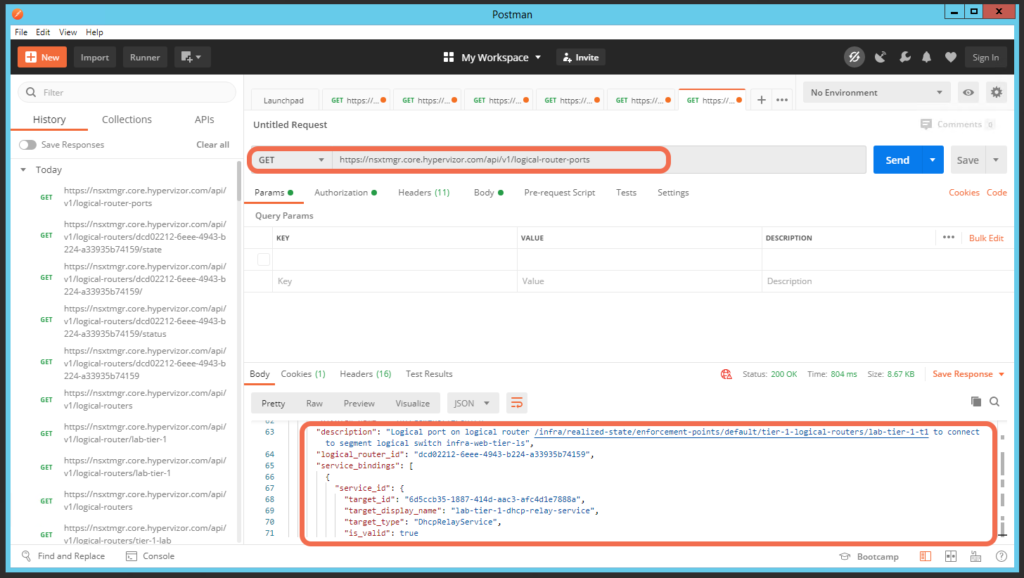
As a sanity check, this corresponding Management Plane API GET validates that this policy change was realized on the web-tier-ls logical switch:
14: Identifying the REST API method using Chrome Developer tools
I’m writing this one here, since I’ve forgotten to use it a few times 😉
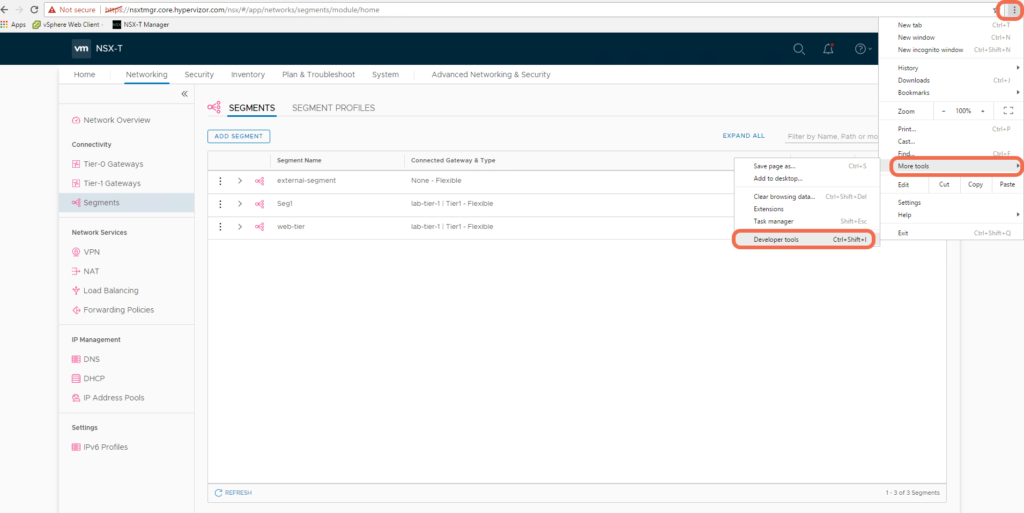
Launch Chrome Developer tools from Chrome as follows:
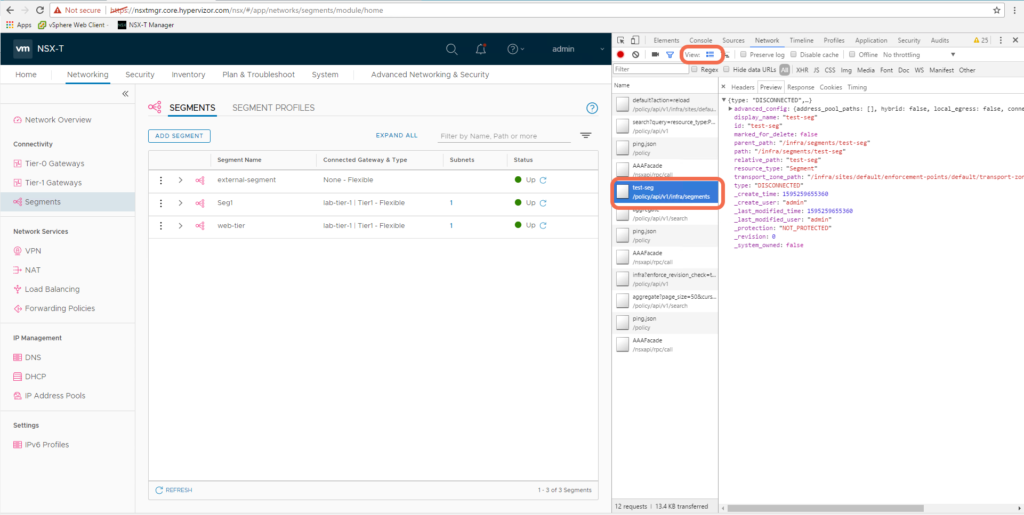
Select the Network tab and perform the operation using the NSX-T Web UI, in this case creating a segment:
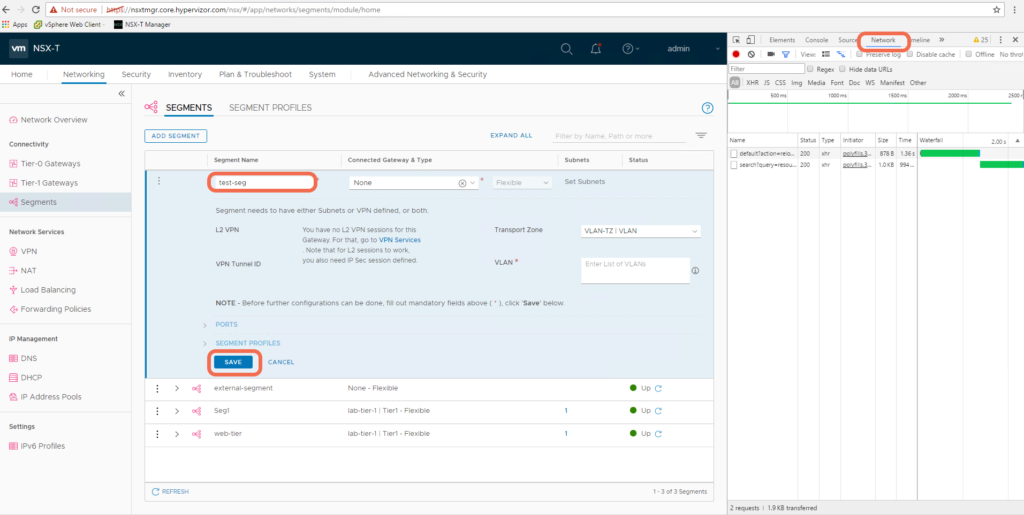
Change the view to “Use small request rows”. Notice that the segment named test-seg was created with the Policy API method /policy/api/v1/infra/segments
