Introduction to NSX-T Principal Identities
Introduction:
In NSX-T, Principal Identities (PI) are role-based users who have ownership of the objects they create. Objects can only be modified or deleted by the owning Principal Identity. PI is an effective method to manage multi-tenancy, where multiple tenants share the same resource infrastructure.
In NSX-T, Principal Identities:
– are certificate-based, and are considered more secure than Basic Auth and Cookie-based Auth
– have a defined lifetime based on their certificate
– do not require vIDM
– are used by cloud management platforms such as Openstack, PKS, Terraform, to manage NSX-T
– manage NSX-T through the NSX-T API
– cannot access NSX-T though the CLI
NSX-T includes a built-in Principal Identity, nsx_policy
Adding a Principal Identity to NSX-T:
Let’s run through the steps to create a PI. All of these steps are performed from an NSX-T Manager.
Step 1: Generate an RSA Private Key:
In this example, I will use OpenSSL to create a private key and a X.509 certificate for PI tenant1:

root@nsxtmgr01:~# openssl req -newkey rsa:2048 -extensions usr_cert -nodes -keyout tenant1.key -x509 -days 365 -out tenant1.crt -subj "/C=US/ST=California/L=Palo Alto/O=VMware/CN=certauth-tenant1" -sha256
Generating a RSA private key
*+++++
**+++++
writing new private key to 'tenant1.key'

A tenant1 private key and certificate have been created:
root@nsxtmgr01:~# ls -larth ten*
-rw-r--r-- 1 root root 1.7K May 16 12:36 tenant1.key <- private key
-rw-r--r-- 1 root root 1.4K May 16 12:36 tenant1.crt <- X.509 certificate
Step 2: Consolidate both the private key and the X.509 certificate into a PKCS #12 file:
In cryptography, PKCS #12 defines an archive file format for storing many cryptography objects as a single file. It is commonly used to bundle a private key with its X.509 certificate or to bundle all the members of a chain of trust. The filename extension for PKCS #12 files is .p12 or .pfx.
root@nsxtmgr01:~# openssl pkcs12 -export -out tenant1.pfx -inkey tenant1.key -in tenant1.crt
Enter Export Password:
Verifying - Enter Export Password:

root@nsxtmgr01:~# ls -larth ten*
-rw-r--r-- 1 root root 1.7K May 16 12:36 tenant1.key <- private key
-rw-r--r-- 1 root root 1.4K May 16 12:36 tenant1.crt <- X.509 certificate
-rw-r--r-- 1 root root 2.6K May 16 12:40 tenant1.pfx <- .pfx PKCS12 portable protected key file

root@nsxtmgr01:~# openssl pkcs12 -in tenant1.pfx -out tenant1.p12 -nodes
Enter Import Password:
MAC verified OK

We now have the following files:
root@nsxtmgr01:~# ls -larth ten*
-rw-r--r-- 1 root root 1.7K May 16 12:36 tenant1.key <- private key
-rw-r--r-- 1 root root 1.4K May 16 12:36 tenant1.crt <- X.509 certificate
-rw-r--r-- 1 root root 2.6K May 16 12:40 tenant1.pfx <- .pfx PKCS12 portable protected key file
-rw-r--r-- 1 root root 3.4K May 16 12:44 tenant1.p12 <- .p12 PKCS12 portable protected key file

root@nsxtmgr01:~# cat tenant1.crt
-----BEGIN CERTIFICATE-----
MIIDwjCCAqqgAwIBAgIJAKci/fmIjIXLMA0GCSqGSIb3DQEBCwUAMGIxCzAJBgNV
BAYTAlVTMRMwEQYDVQQIDApDYWxpZm9ybmlhMRIwEAYDVQQHDAlQYWxvIEFsdG8x
DzANBgNVBAoMBlZNd2FyZTEZMBcGA1UEAwwQY2VydGF1dGgtdGVuYW50MTAeFw0y
MDA1MTYxMjU0NTBaFw0yMTA1MTYxMjU0NTBaMGIxCzAJBgNVBAYTAlVTMRMwEQYD
VQQIDApDYWxpZm9ybmlhMRIwEAYDVQQHDAlQYWxvIEFsdG8xDzANBgNVBAoMBlZN
d2FyZTEZMBcGA1UEAwwQY2VydGF1dGgtdGVuYW50MTCCASIwDQYJKoZIhvcNAQEB
BQADggEPADCCAQoCggEBAMXHUc0YZ1brIu/Ho/gILT1hP6hOmjf+SGlMNP22FJJs
TquyBABx6B/Dr3TgiIxlGPLp4iqEimUWG4Jua4xstdIDbeU2iLqkhQJinGEbmbh4
H/X9khnmX4ZbbVyDLnwb0EV0L8pkDUKfxsB8StRMJDwOLu4T8aAB+mtRR7aQ1nyW
1tMt3HFNnl4jL29vgjpb0bvSSxLRUWZUgGdbkRs2qLw3lTLXgib9KspjvDOeR2db
XDzG24LkKOjieIFqrCBfn8RQQbbOGi0w20ZnClNz887ug4RkLZl8BOosoN0GNwT5
y+QEid6nEt4rwCTqqZXnkc//iaE5j8JNlz2gBka4Vy8CAwEAAaN7MHkwCQYDVR0T
BAIwADAsBglghkgBhvhCAQ0EHxYdT3BlblNTTCBHZW5lcmF0ZWQgQ2VydGlmaWNh
dGUwHQYDVR0OBBYEFO0Zsn0WjCzHok5Ho9Mcp16slgVYMB8GA1UdIwQYMBaAFO0Z
sn0WjCzHok5Ho9Mcp16slgVYMA0GCSqGSIb3DQEBCwUAA4IBAQDCsiB1mQl+/Etr
iniHD1YOIcqa/zVigFoVhyIV6G5sjWNLfC47GnMUZ5PWpl7ebPRd/qlblMP0rgp9
EpOF1mOrelHxFsjouIlpwmBL4xMu2oUuih7YdIIdCFPswn86btxChlbhZSFR3CAM
fmtqDhKQo209AGMK909VsGh+z1jLhkEzymGkmwN5BDNGckHoMPEieYAtxxU3Jy8t
PoV+05rbsTJUcTWPbTpzonHNEHI8VXGycAy/MZhtheerEjGF2/U6RgmOCjgPc1AT
Y1ll8xynX9v/xSYk9Jv26xS8EWyrKMJjLWEJX1es80z5vfsSuaI0QVOPETUsM/vc
/9fg5v4D
-----END CERTIFICATE-----
Step 3: Add a Principal Identity with Role:
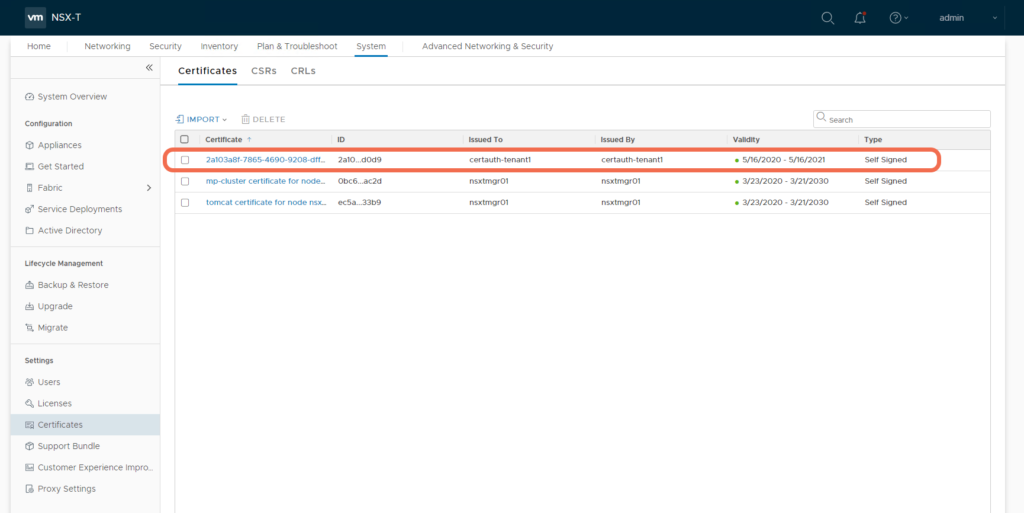
Let’s create a PI for tenant1 with Enterprise Admin permissions, using the NSX-T Web UI:fpng
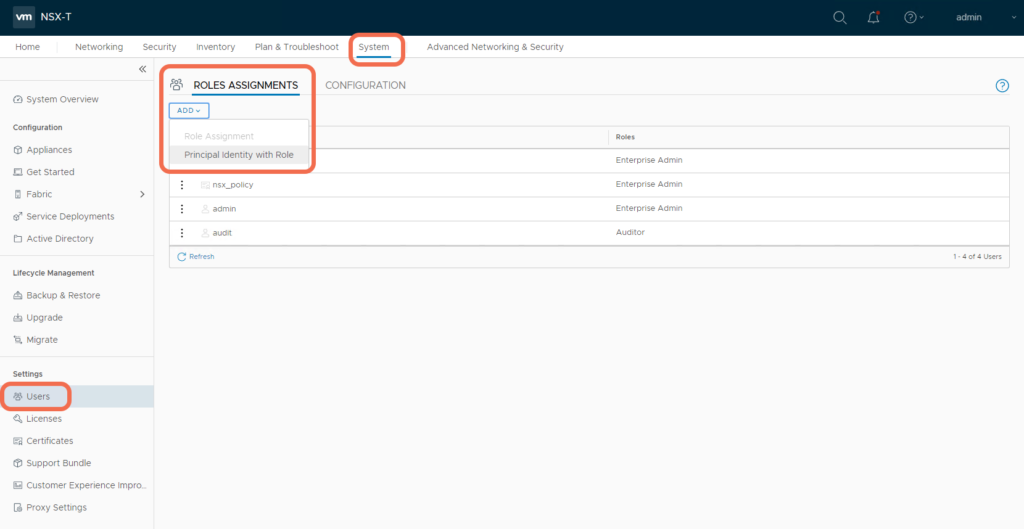
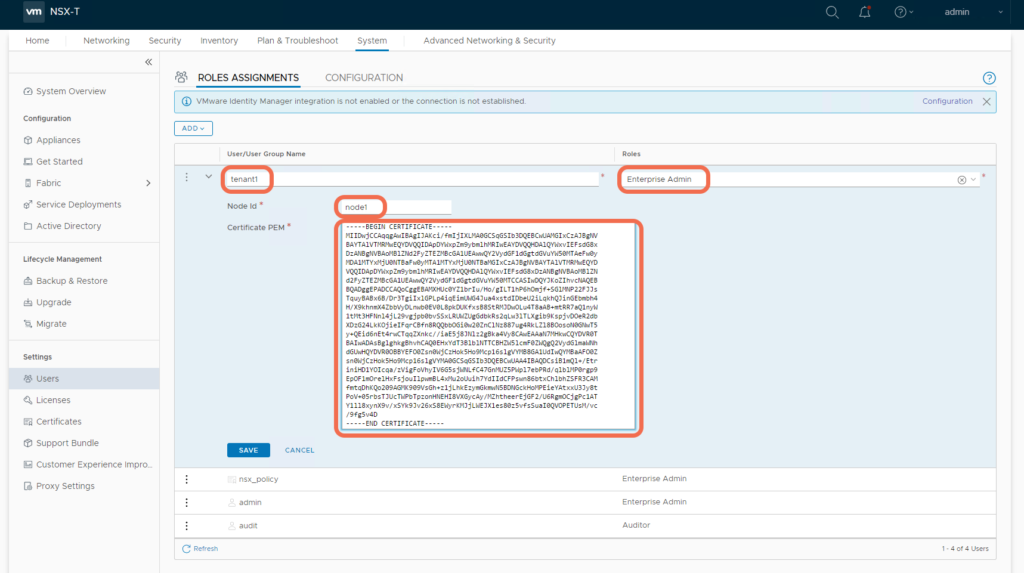
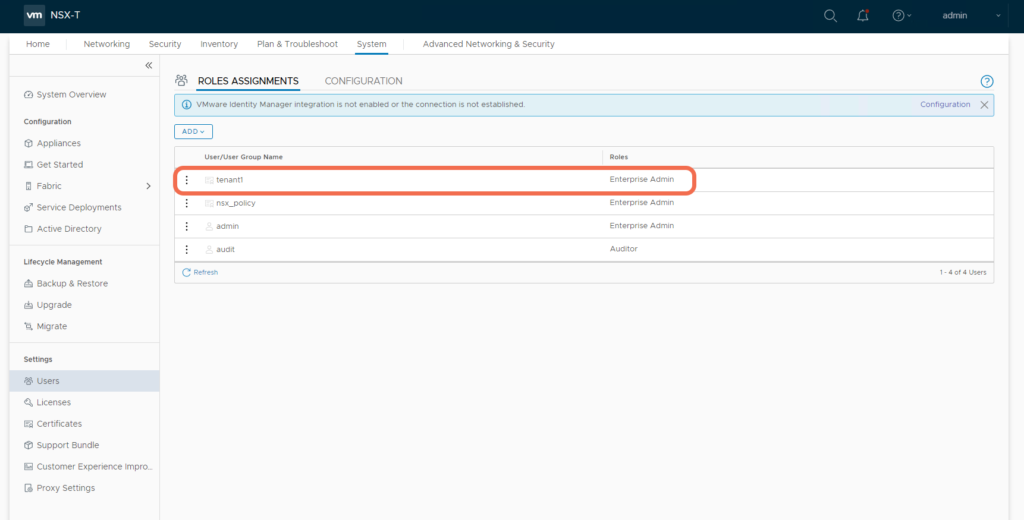
That’s it, we have created Principal Identity tenant1:
Notice that this operation imported the tenant1 certificate as expected:
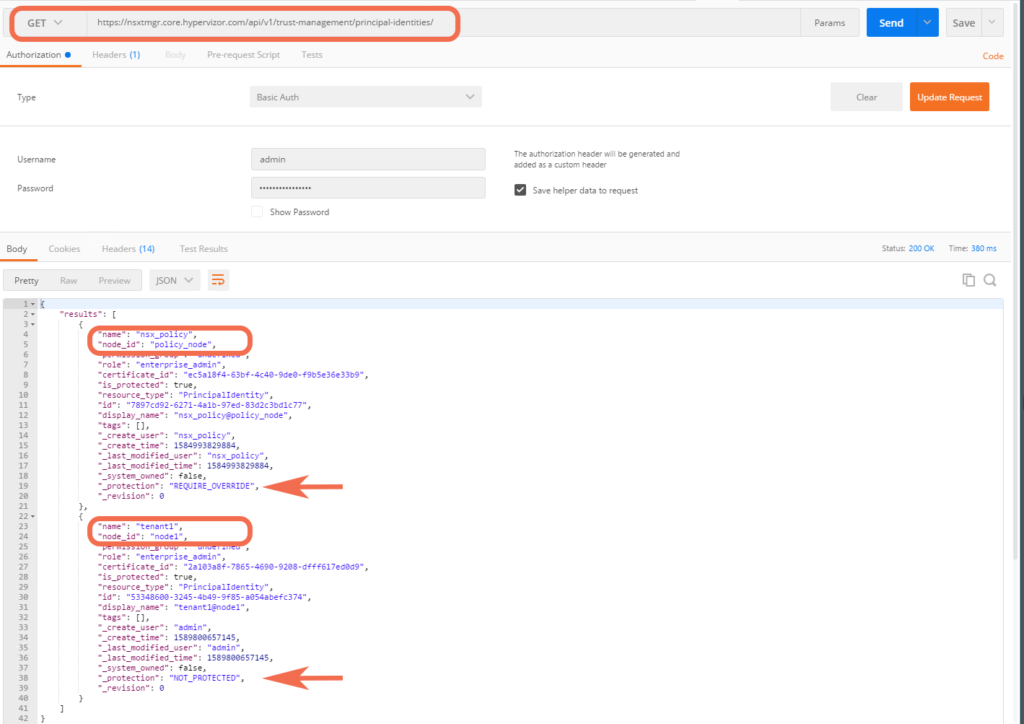
Viewing NSX-T Principal Identities:
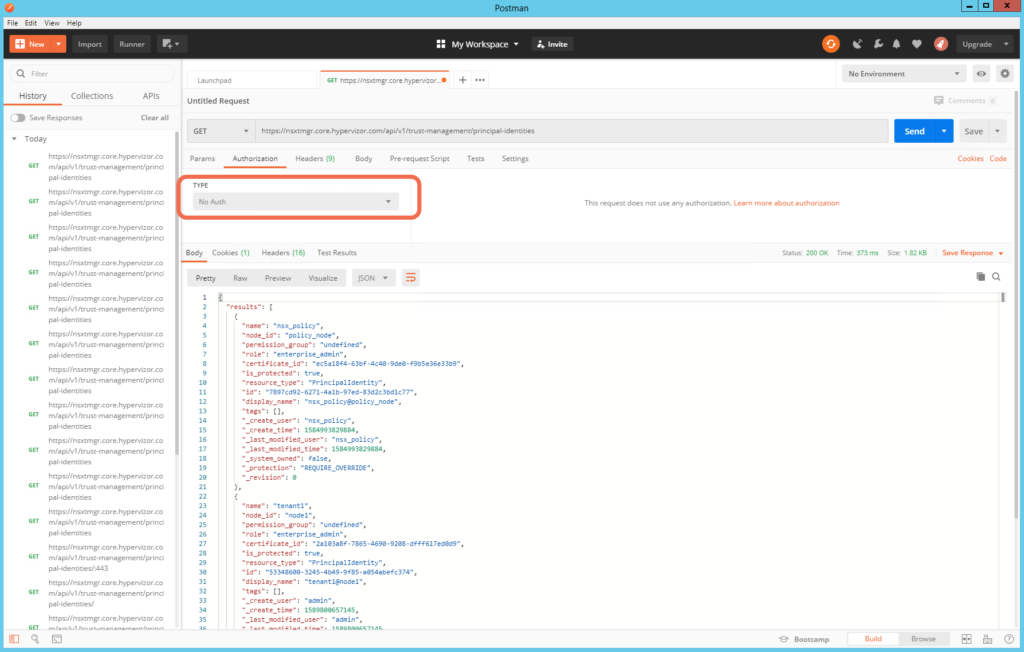
Let’s use Postman to look at the resulting Principal Identities, using the following REST API call:
GET https://nsxtmgr.core.hypervizor.com/api/v1/trust-management/principal-identities/
Notice that NSX-T includes by default a built-in PI, nsx_policy, that is used by the NSX-T Policy service:
- the nsx_policy PI is protected, meaning that to delete this PI an override is required, indicating that it is system owned
Creating Management Plane objects using a Principal Identity:
In this Introduction to NSX-T Principal Identities, we will begin by transferring the PKCS #12 file over to a Test Linux Guest named ansible:
root@nsxtmgr01:~# scp tenant1.p12 [email protected]:/
[email protected]'s password:
tenant1.p12 100% 3420 3.3KB/s 00:00

Notice that in the cURL command, we aren't using Basic Auth or Cookie-based Auth, but unstread the PKCS #12 file:

Tenant1 creates an IP Set via the Management plane API:
[root@ansible /]# curl --cert ./tenant1.p12 -k -X POST -d '{ "display_name":"ipset","ip_addresses":["192.168.1.1-192.168.1.6","192.168.1.8","192.168.4.8/24"]}' -H "Accept: application/json" -H "Content-Type: application/json" https://nsxtmgr.core.hypervizor.com/api/v1/ip-sets
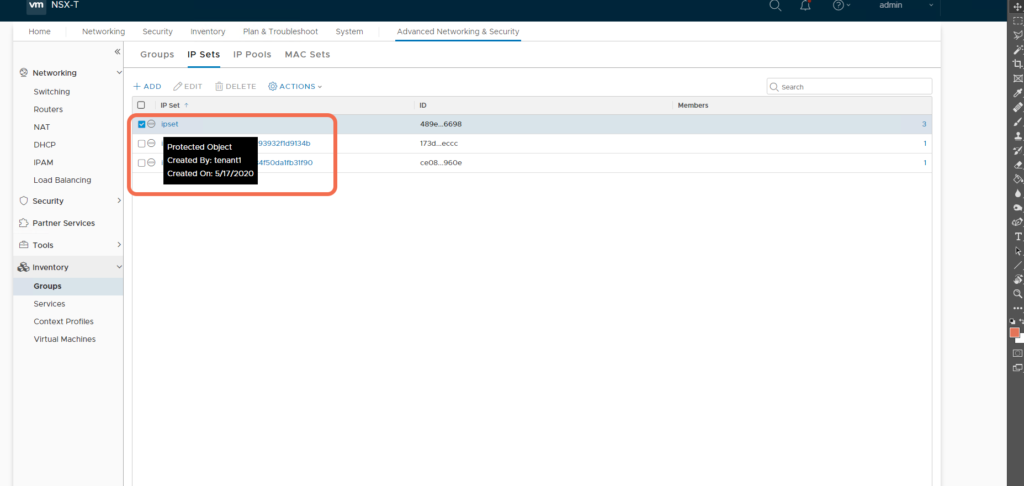
Notice that this created Management Plane IP Set object is protected, and owned by tenant1:
Creating Policy objects using a Principal Identity:
For comparison, we will now create a Policy object using the Policy API:
Tenant1 creates an IP Set via the Policy API:
[root@ansible /]# curl --cert ./tenant1.p12 -k -X PATCH -d '{"display_name": "Finance-block", "description": "Finance-block Description", "cidr": "192.168.0.0/16"}' -H "Accept: application/json" -H "Content-Type: application/json" https://nsxtmgr.core.hypervizor.com/policy/api/v1/infra/ip-blocks/Finance-block
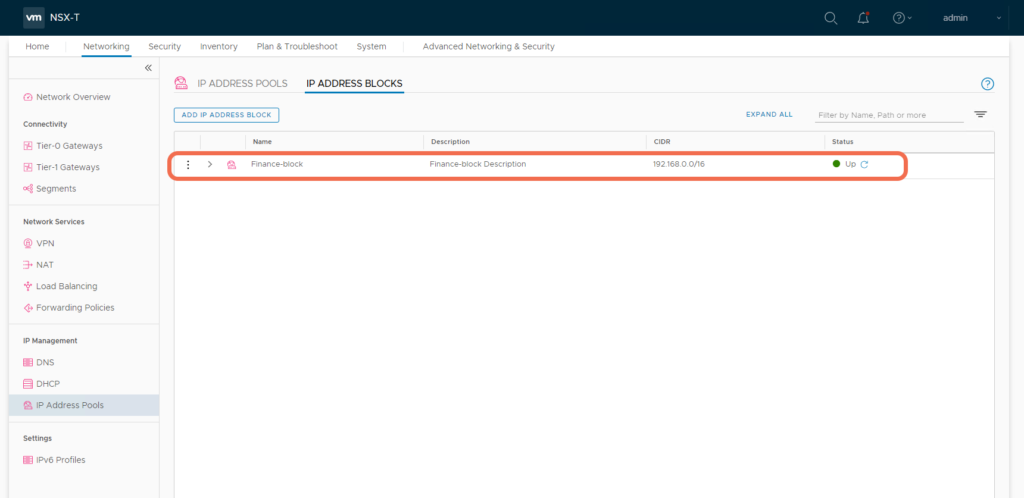
The object protection happens at the Policy API layer and not at the Management API layer. The Policy API engine uses its own Principal Identity to interact with the Management plane API.
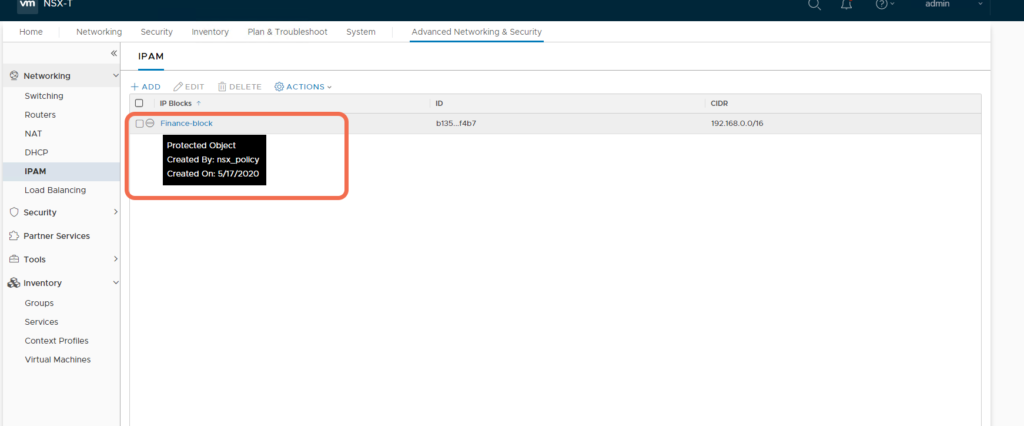
Attempting to Delete a Principal Identity Owned Object:
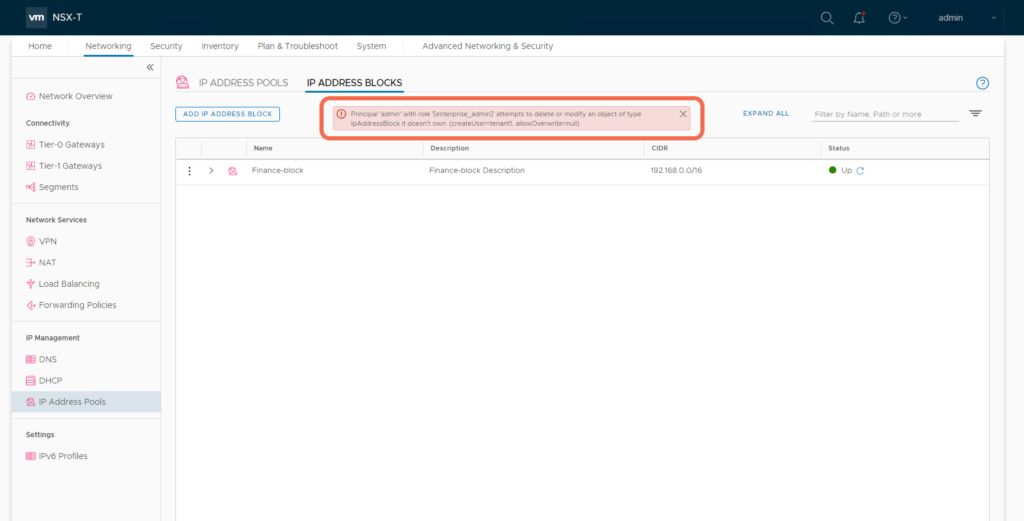
It is not possible to delete this tenant1 owned object through the NSX-T Web UI. An attempt results in the error:
- Principal ‘admin’ with role ‘[enterprise_admin]’ attempts to delete or modify an object of type IpAddressBlock it doesn’t own. (createUser=tenant1, allowOverwrite=null)
Deleting a Principal Identity owned Object:
Since tenant1 owns the Finance-block IP Address Block object, it can delete it:
[root@ansible /]# curl --cert ./tenant1.p12 -k -X DELETE -H "Accept: application/json" -H "Content-Type: application/json" https://nsxtmgr.core.hypervizor.com/policy/api/v1/infra/ip-blocks/Finance-block
Using Principal Identies in Postman:
Reference: https://learning.postman.com/docs/postman/sending-api-requests/certificates/
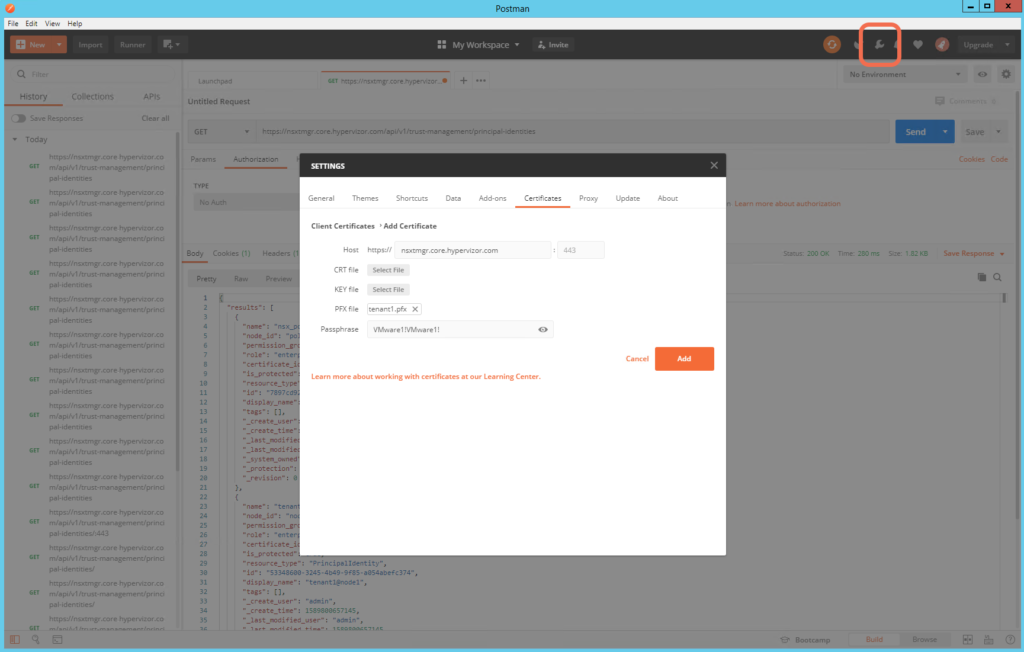
To do Client Certificates in Postman you need the Postman Application, since Certificates are not supported in the Postman Plugin for Chrome:
With my Postman Application running on a Windows-64bit OS, I will use tenant1.pfx, and will specify the Passphrase used when tenant1.pfx was exported:
With a Postman Client Certificate in place for nsxtmgr.core.hypervizor.com, set Authorization type to No Auth:
Summary:
We have been able to create a Principal Identity and use it to create objects with cURL and Postman. We’ve also taken a quick look at the implications of ownership on both Management and Policy created objects.
I hope you find this introduction to NSX-T Principal Identities helpful, and that you find it an effective method in managing multi-tenancy in your environment. For some additional reading, I have an article that includes more on cURL here:

Great Content and Go to Blog for NSX-T !!! Thank You for the detailed technial write-up !!!
Thank you for the support, there is more content to follow 🙂